DIY foundation of FBS blocks
Everyone, without exception, wants to have a solid foundation. And one of the most reliable and predictable is tape. But monolithic strip foundation takes a long time to build: only for assembly formwork it takes from three days, and it is still necessary to knit reinforcement, then concreting and wait several days until it gains at least half of its strength. It will take at least two to three weeks. It is good if there is such a reserve of time, but what if there is not? There is a way out: smart people came up with part of the work to transfer to the enterprise - they make concrete blocks - FBS. Then a foundation is made of them, which is called a precast belt. The FBS foundation is easy to make with your own hands.
When using this technology, the foundation is assembled from reinforced concrete blocks of various types and sizes. Therefore, it is often called block or prefabricated. They are all the same type.
The content of the article
Advantages and disadvantages
The most important plus of the prefabricated strip foundation made of FBS is a small resource of time that is required for its manufacture. It only takes a few days to assemble.
The main disadvantage: it is not monolithic, therefore it cannot be installed everywhere and not always. Prefabricated tapes from blocks are normally installed on dry soils not prone to heaving. Under other conditions, a calculation is required, and better - a professional one.
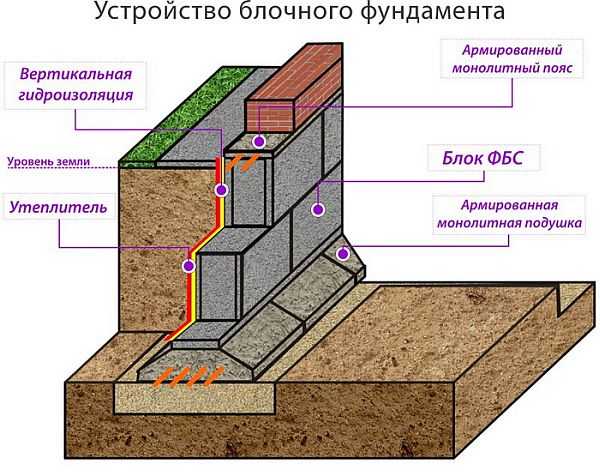
Block foundation device
It should be noted that prefabricated foundations must be carefully waterproofed and insulated. It is also necessary to make an insulated blind area... These are the necessary conditions for their normal operation.
If we compare the tape monolithic and block foundation, then the following picture emerges:
- Monolithic takes a long time to build, block - quickly.
- A monolithic tape can be made without renting special equipment (although it is difficult to do without ordering concrete). To assemble the foundation from the FBS with your own hands, you will need to rent a crane, or at least a winch.
- If you make a monolithic foundation yourself, it costs less than a block foundation. If hired workers or a company work, then it will cost rather more: the volume of work is greater, and this is a considerable additional cost.
- The monolith is more durable than the precast. The strength is about 20-30% higher. This allows him to use a monolithic tape on loam and clay.
Monolithic tape wins in many ways. But if its strength and reliability will not be in demand, then its manufacture is only a waste of time. Contractors are also a waste of money. Therefore, if the soils have normal bearing capacity, and groundwater is no closer than 2 meters from the required depth of the foundation, it makes sense to put the house on a prefabricated foundation.
Foundation blocks: types, sizes, marking
In private construction, several types of blocks are used. For the device of a strip prefabricated foundation, only two types are most often used:
- FBS - solid building foundation block. When they talk about this type of block, they mean a reinforced concrete (with reinforcement) element without voids. These are rectangular blocks of various sizes with mounting steel hinges on the upper surface. Sometimes vertical channels are formed in the side faces, which are filled with mortar during construction. From these blocks, a foundation strip is folded.
- FL - blocks-pillows. They look like a trapezoid. They are laid on a prepared base and serve to increase the bearing capacity of the foundation.
When erecting a strip foundation, it is necessary to provide for routes for laying and supplying engineering systems: water supply, sewerage, electricity, heating. It is necessary not to forget about the ventilation system and leave openings for air vents for ventilation of the underground space or basement. For this, blocks with a channel for laying communications can be useful: FBV.
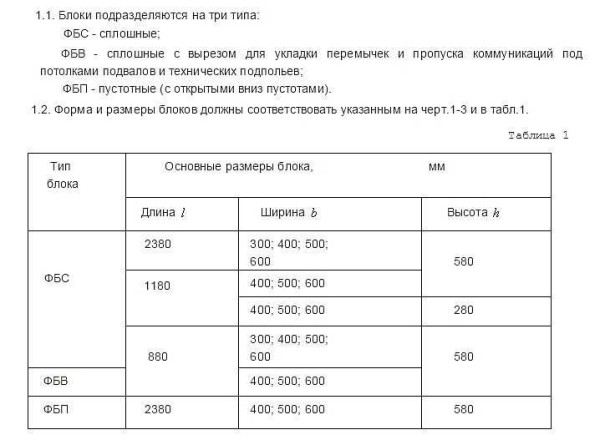
The sizes and types of blocks are regulated by GOST 13579-78. For a private developer, it is mainly the size and performance that are important. The photo below shows a part of the standard that defines the types and sizes of blocks.
GOST marking
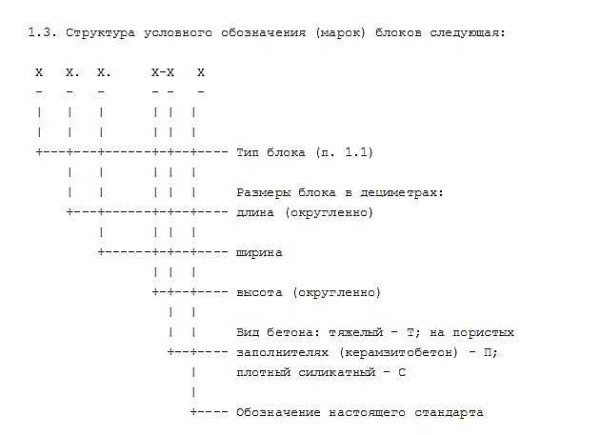
To make it easier to navigate the specification, the names of the blocks by the same GOST contain information about their sizes and type.
The title comes first. Further - numbers describing the geometry in decimeters;
- the first is the length (9, 12.24);
- the second (through a dash or dot) - width (3,4,5,6);
- the third is the height (3.6);
Marking of concrete foundation blocks
If any length and width are found, then the FBS height is usually made 580 mm (in the marking "6"). Blocks with a height of 280 mm can be made on request.
Further, after the numbers, there is a letter designation of the type of concrete used:
- T - heavy (cement-sand mixture with crushed stone). Heaviest high density block. It is this type that is used in the construction of foundations.
- P - porous with expanded clay aggregate. They have less weight, but also less strength, and are also more hygroscopic.
- C - from silicate concrete (the main binder is lime). This type of blocks is afraid of getting wet, therefore it is not used in the construction of foundations.
For example, FBS 24.4.6 -T stands for a rectangular block made of high-density reinforced concrete. Length 2380 mm, width 400 mm, height 580 mm. By analogy, you can decipher other designations.
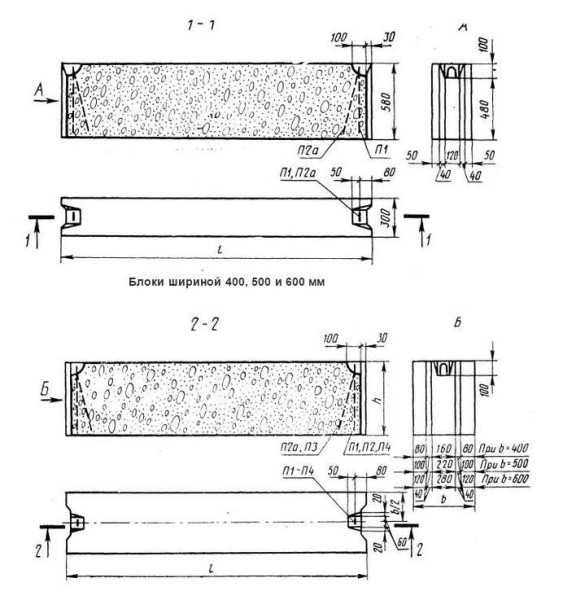
Dimensions of FBS blocks according to GOST
Stacking FBS blocks
The choice of block width is determined by the thickness of the walls located above. The length of the blocks is selected so that they occupy, if possible, the entire tape. But even experienced builders are mistaken when selecting blocks: some unfilled areas remain, into which even the smallest elements do not become (they are called additional). These areas are usually covered with cement mortar bricks. If the masonry turned out to be uneven, it is then plastered: it will be more convenient to apply waterproofing and insulation.
Usually a prefabricated strip foundation consists of several rows of blocks. Their specific number depends on the required belt height. More often it is laid below the depth of soil freezing. The required base / plinth height is also taken into account.
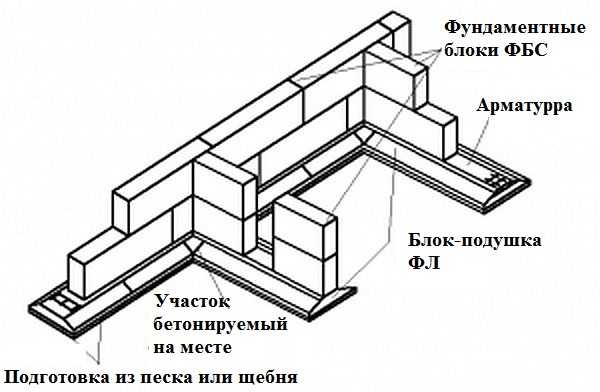
Block foundation device. When laying the pillow blocks, some areas are left empty. They are concreted after installation.
When installing concrete blocks of any type, the same rule is used as when laying bricks: the seams must not match. To do this, they are placed so that the seam of the previous row is overlapped by the body of the block in the next row. The gaps (vertical seams) between the adjacent elements are filled with cement-sand mortar.
To give the structure more strength and to bind all the blocks into a single system, reinforcement is laid on top of each row. Depending on the type of soil and the weight of the building, a bar of class A-I - A-III is used. The number of rods is determined by calculation during the design, they can be from 2 to 5 pieces. When laying and connecting the bar, all rules are observed strip foundation reinforcement - the connection of corners, walls occurs in the same way. The only difference is that there is only one reinforcement belt. A layer of mortar is laid on top of the reinforcing belt, on it, with an offset of the seams, the next row of blocks is exposed.
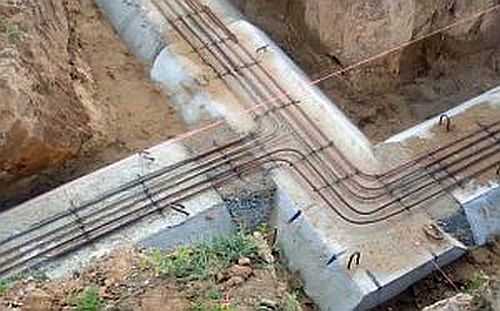
To make the foundation from the FBS with your own hands more durable, it is reinforced
If these rules are observed, the prefabricated strip foundation will be strong and reliable.
Do-it-yourself foundation from FBS
The technology of building a prefabricated foundation, especially at the preparation stage, is not much different from other types: first, we dig a foundation pit. The difference is in the less laboriousness of manufacturing the tape itself and in the fact that there is no need to make formwork.
Preparation of the base for a block foundation is standard:
- The fertile soil layer is removed, taken out or stored on the site.
- Next comes the markup. If a basement is provided in the house, the perimeter is marked, if there is no basement, the tape is marked. The markings are done with pegs and cords. The tape is marked on both sides, indicating the width of the wall.
- Next comes the earthworks. The soil is removed to the planned level.
- The bottom of the pit or trenches is leveled and pre-rammed.
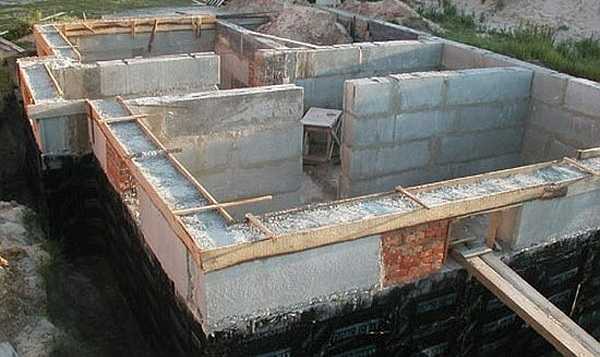
When assembling blocks, do not forget to leave holes for engineering systems: breaking the foundation is unacceptable
- A layer of sand or crushed stone is filled up and well rammed using a vibrating plate. Manual ramming will not produce the required seal. Therefore, it is better to use a vibrating plate. This is especially important if the bearing capacity of the soil is not very high. An operation as simple as a well-compacted sand and gravel bed can be greatly improved.
- Two layers of waterproofing are laid on the compacted base.
- FL foundation blocks are installed. They are laid out strictly horizontally. Check the correctness of the setting with a building level or level. The gaps between them are filled with cement-sand mortar.
- Reinforcement is laid, on top of it a layer of mortar is at least 2-3 cm.
- FBS blocks are installed with displacement seams. No joint should match. The minimum offset is 0.4 of the height of the exposed block. If FBS is used with a height of 580 mm, then the offset must be greater than 240 mm.
- If there is another row of blocks, the armopoyas is again laid and a solution is placed on top of it.
- Blocks are also exposed with offset seams.
The number of rows depends on the required base height and the required belt depth. Compliance with the rule for stacking blocks with dressing is mandatory. Only in this way, having assembled the foundation from the FBS with your own hands, will you get a reliable foundation for the entire structure.
How to lay FBS
In any row, styling starts at the corners. Then blocks are exposed in places where the walls are removed. They are called lighthouses, and then everyone else is equal to them. The verticality of their exposure is checked, and corrections are made if necessary. More often than not, the unit will need to be lifted, moved and put back in place.
After the lighthouse elements are exposed, the moorings are pulled - the cords along which they are guided when installing the following blocks. They mark the boundaries of the wall, and so that the FBS stand symmetrically relative to the middle of the FL block (pillow block). The maximum permissible deviation is 12 mm. All subsequent rows of blocks should also be placed exactly above the middle.
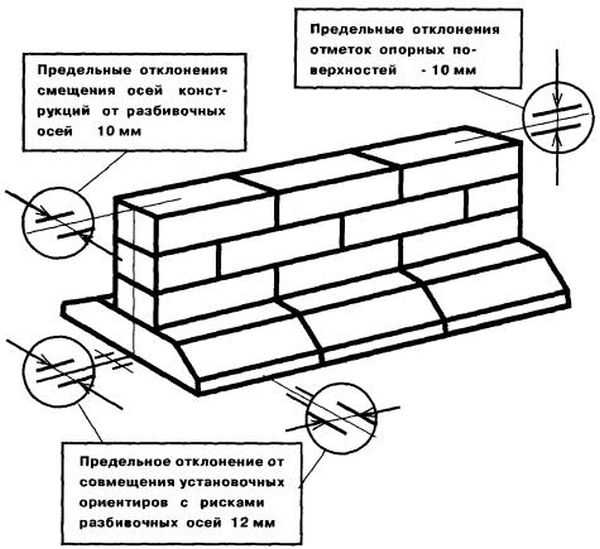
When stacking blocks, make sure that they are stacked one above the other without too much displacement
It is more convenient to pull the cords 2-3 mm from the side surfaces of the lighthouse blocks. This will make it easier to exhibit. Intermediate blocks are set starting with the largest: first they put everything 2.4 meters long, then 1.2 and then 0.9. The correctness of their installation is checked with respect to marking cords, verticality - with a plumb line.
How to choose the size of FBS blocks
You can determine how many blocks you need for your foundation by selection. You can do this yourself on a plan drawn to scale. On the plan, you mark each block on the same scale.
The sizes of blocks for the foundation from the FBS are chosen, based on a simple rule: to increase the strength of the structure, you need to use the largest block sizes. Therefore, first you draw the 2.4-meter blocks installed in the corners, then, if they fit, draw them in the places where the walls adjoin.Between them, also put the largest blocks that can fit there. Where they no longer become, put a smaller one. If there are any gaps in which even the smallest block (0.9 meters) does not fit, it is not scary - these gaps are filled with brickwork.
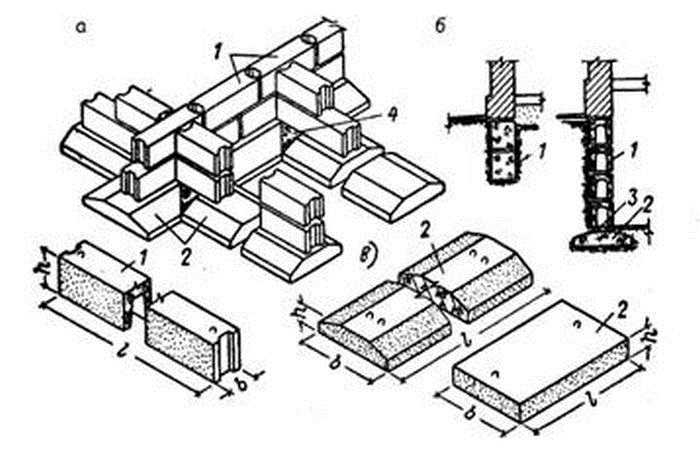
Two types of prefabricated strip foundations made of FBS - with and without cushion (shallow tape)
Draw the second row in a similar way, not forgetting about the offset of the seams. If necessary, draw the third in the same way. Then count the required number of blocks of each size. Do not throw away the resulting plan: it will be useful to you when installing the prefabricated foundation already on the site.
Masonry mortar FBS
For the laying of foundation blocks, a standard cement-sand mortar of the M-100 brand is used. It can be obtained using different cement uterus and the amount of sand:
- for 1 part of cement M300 take 2.5 parts of sand;
- for 1 part of cement M400 sand is already 3 parts;
- when using M500 sand, add 4 parts.
First, dry components are mixed until a uniform composition and color is obtained. Then gradually add 0.5 parts of water. If the solution turns out to be too thick, the water is gradually added in small portions. The consistency should be like thick sour cream: not a lump, but not flowing either.
Don't try to increase the amount of cement. This will not only not increase the strength of the concrete, as expected, but will greatly reduce it. To gain strength, concrete requires a strictly defined amount of aggregate (in this case, sand) and water. With a lack of one and / or the other, its strength will be lower. In the worst case, it will crack and crumble.




thanks for tne great info