Do-it-yourself installation of interior doors: photo, video
Sooner or later, you have to change the interior doors. The procedure is not so complicated that it is imperative to hire a specialist. If you have at least some skills in handling a saw, a level and a plumb line, you can tighten a few screws - do it yourself. When replacing, before installing the interior door, the old one must be dismantled. And here, too, there are features. All the intricacies - in the photo and video with detailed instructions.
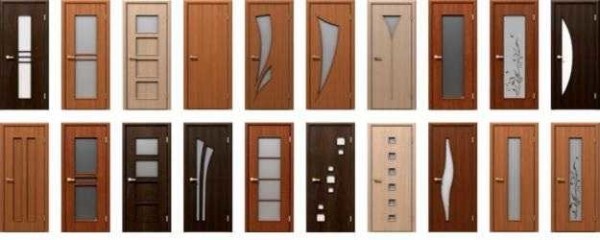
Interior doors are different not only in design, but also make them from different materials
Interior doors are made from different materials. Moreover, the material of both the door leaf and the frame differs. The door leaf is:
- From fiberboard. These are the cheapest doors. They are a wooden frame to which laminated fiberboard is attached. They are characterized by low sound insulation, are afraid of high humidity, and are easily damaged.
- Made of MDF. They cost much more, but the quality characteristics are much higher. They are better in sound insulation, are not afraid of moisture, stronger and more durable.
- Wood. The most expensive doors. They are made from different types of wood - from pine to oak or more exotic species.
Door frames are made of the same materials. The worst choice is fiberboard boxes, they even bend under their own weight, and hanging the door leaf on them is sheer flour. So try to take either MDF or wood. There is one more material: laminated wood. The good thing is that you do not need to process and paint, but the service life depends on the quality of the film.
The content of the article
Dimensions and equipment
Interior doors are available in standard sizes, it's a pity that the standards differ in different countries. For example, in our country, swing doors are made with a width of 600 - 900 mm with a step of 100 mm. In some EU countries, the standards are the same - in DGermany, Italy and Spain. Others are standard in France. Here the narrowest doors are 690 mm and further with a step of 100 mm.
Is the difference so important? If you only want to change the door leaf without a box, then it is important - you will have to choose from your segment or completely change it together with the box. Interior doors of the same standard as in our country, the choice is much greater, as in France - several times less.
How wide the door is needed depends on where you are going to put them. In terms of standards, the following values are recommended:
- in a living room, width from 60 to 120 cm, height 2 m;
- bathroom - width from 60 cm, height 1.9-2 m;
- in the kitchen, the width of the door leaf is at least 70 cm, the height is 2 m.
If, when replacing the door, it is decided to make the opening larger / smaller, you do not need permission for this, but you must stay within the limits specified for each room.
How do you determine which door width to buy? Measure the door leaf you have and you will know what you need. If there are no doors, find the narrowest point in the opening, by measuring it, you can find out how wide you need the door block. This is the door leaf + door frame. So the outer dimensions of the door frame must be less than the measured value. For example, if you got 780 mm, look for a block with 700 mm parameters. The wider ones cannot be inserted into this opening.
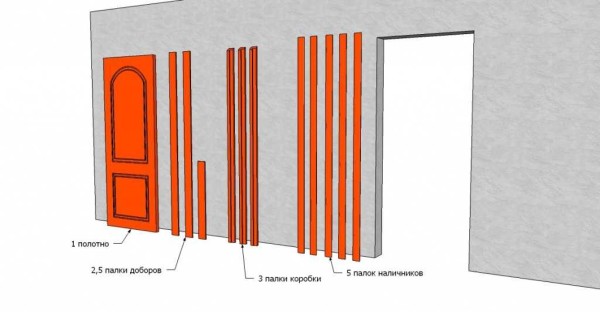
When choosing a door, pay attention to the complete set. There are three types of assembly:
- Door leaf. Buy the box separately.
- Doors with a frame. Everything is included, but the box is in the form of separate boards.You will have to file the corners and connect, hang the loops yourself.
- Door block. These are ready-to-install doors - the box is assembled, the hinges are hung. Only trim the sidewalls to the height, align and secure.
With the same quality of the door leaf, the prices for these kits differ significantly. But the difference in the time you will spend on installation is decent.
Step-by-step installation of interior doors
In general, there are many subtleties. We will try to describe and illustrate the most common moments in a photo or video material.
Step 1: Assembling the door frame
If you did not buy a pre-assembled door unit, the first step is to assemble the door frame. It consists of two long posts located on the sides, and one shorter crossbar at the top - the lintel.
Connection methods
There are at least two options for how to connect these strips to each other:
- At 45 °. The option is the most correct from the point of view of aesthetics, but the most difficult to perform. A high cutting accuracy is required so that there are no gaps. With skill, you can saw off using a carpenter's miter box, but you need to do it carefully. The second point is that if you cut the laminated material with a hacksaw, chips remain on it. The way out is to use a well-sharpened tool.
- Install end-to-end, at 90 °. This method is simpler - there is less opportunity for error, but it is necessary to remove part of the protrusion at the junction of the uprights and lintel. To do this, we attach a section for the lintel, cut off with a solid margin, to the corner. Draw a pencil around the part that interferes with the connection. Remove the excess with a chisel. Having tried it on a couple of times, we connect it, set the angle exactly, watch the relief coincide. In this position, we drill holes for self-tapping screws. Drill diameter - 1-2 mm less than the fastener diameter. Then we connect this knot, constantly monitoring 90 ° and the accuracy of the relief coincidence.
Regardless of which way you are going to connect the elements of the door frame, the first step is to wash down the racks and lintels on one side. Then they are put in a box on the floor, checking the correctness of the connection. Next, you need to decide on the height of the side parts of the door frame.
Determine the dimensions
When folded, the required length is measured along the inside of the rack. The racks are not always made the same: the floor is often uneven and this must be taken into account. To do this, take a level and check how level the floor is. If it is perfectly level, the racks will be the same. If there is a deviation, it must be taken into account: make one of the racks longer. Usually this is a few millimeters, but even this is enough for the doors to warp.
When calculating the height, keep in mind that the racks should be 1-2 cm longer than the door leaf (taking into account the cuts). A gap of 1 cm is made under the door, if they do not intend to put a rug under the door. If there is a rug / carpet / carpet, it is better to make it larger. Don't be afraid to leave gaps. They are necessary for normal ventilation in the room... Note again: the height is measured along the inside of the door frame - from the bottom edge to the saw cut. Cutting off, try on the racks in the doorway.
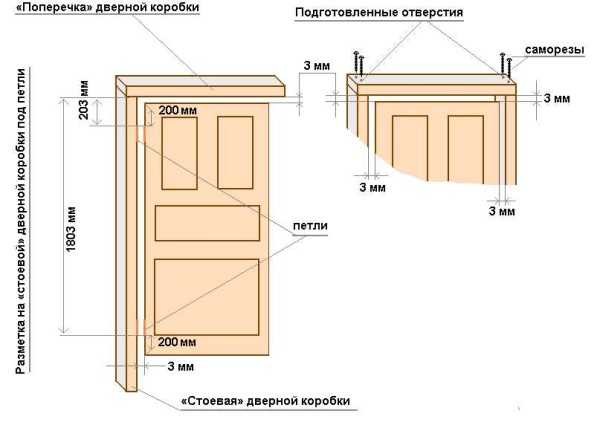
Clearances when installing interior doors
Now you need to saw off the lintel along the length and, if necessary, saw it off on the other side (if the joint is at 45 °). The length of the lintel should be such that when folded, the distance between the posts is greater than the width of the door leaf. The minimum clearance is 7 mm, but it is often made larger. 7-8 mm are distributed as follows: 2 mm for the hinges, and 2.5-3 mm for expansion gaps. Any interior doors - MDF, fiberboard, wood - change their dimensions depending on humidity. Clearances are required to accommodate these changes. And 5-6 mm is not always enough, especially in humid rooms. For the bathroom, just leave a little more, otherwise they may be difficult to open with high humidity.
So, we decided on the minimum gaps when installing interior doors:
- on hinges - 5-6 mm;
- top, bottom and sides - 3 mm;
- bottom - 1-2 cm.
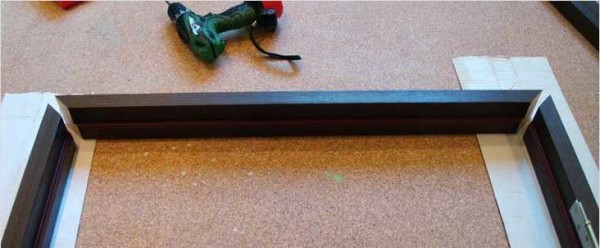
After you have cut off all the pieces and made the cuts, fold the box down on the floor. If you notice somewhere flaws in the docking, eliminate it with sandpaper attached to the bar. The more accurate the match, the smaller the gap.
Assembly
Regardless of the material of the box and the method of connection, holes are pre-drilled for fasteners - so that the material does not break. The drill diameter is 1 mm less than the screw diameter.
The box is folded, angles are set at 90 °. Holding the rack and lintel in this position, drill holes with a drill. If there is an assistant, he can hold. If you work alone, temporarily fasten the correctly positioned box with two transverse bars - closer to the top and bottom. This will help you avoid mistakes and make the right connection.
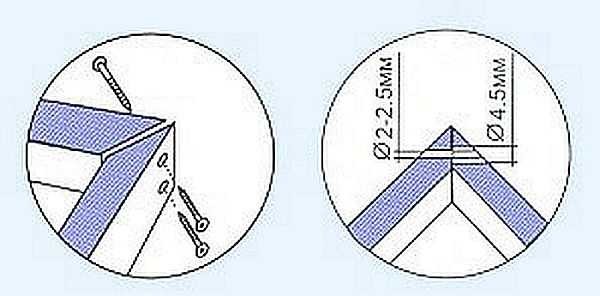
How to connect a door frame in the corners
If connected at an angle of 45 °, three holes are made on each side. Two on top - stepping back a centimeter from the edge, and one on the side - in the center. In total, three self-tapping screws are required for each connection. The direction of installation of self-tapping screws is perpendicular to the connection line.
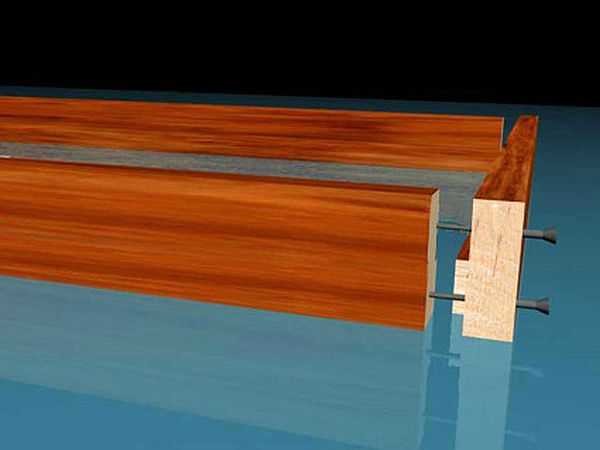
How to connect a door frame
If connected at 90 °, everything is simpler. Drill two holes from above, directing the drill exactly down.
Step 2: stitching
Most often, 2 hinges are installed on interior doors, but 3 hinges are also possible. They are set backing 200-250 mm from the edge of the door leaf. If the frame and door leaf are made of wood, choose a location so that there are no knots. First, the hinges are attached to the door leaf. The procedure is as follows:
- We apply loops to the selected places, outline the contours. The easiest way to do this is with a finely sharpened pencil, but experts advise - with a knife blade. This makes it more accurate and the gaps remain smaller.
- If there's milling cutter, work them, if not, take a chisel and choose the material for the thickness of the loop. More sampling is not necessary, only for the thickness of the metal.
- A loop is installed in the prepared recess. Its plane should be flush with the surface of the canvas.
- The exposed loop is fixed with self-tapping screws.
Having fastened two hinges, the door leaf is placed in the assembled box, the correct gaps are set: from the hinge side - 5-6 mm, 3 mm from the opposite side and from above. Having set these gaps, the canvas is fixed with wedges. Exposed exactly in horizontal and vertical planes (shims can be used, if necessary).
After exposure, the locations of the mating parts of the loops are marked. Sometimes it is more convenient to remove the already installed loop and then reinstall it. A notch is also made according to the marking. Depth - so that the surface of the hinge is flush with the surface of the door frame.
Do-it-yourself door hinge is described in detail in the video.
Step 3: Install the door frame
The assembled box must be correctly inserted into the opening. This is a very important task. Before installing the interior door, knock down everything that can fall off in the opening. If the wall is too loose, the surface is treated with deep penetration primers with an astringent effect. If there are too large holes, they are covered with plaster, very large protrusions are constrained. It is easier to insert an interior door into the prepared opening. If this is your first time doing this yourself, make it easier for yourself.
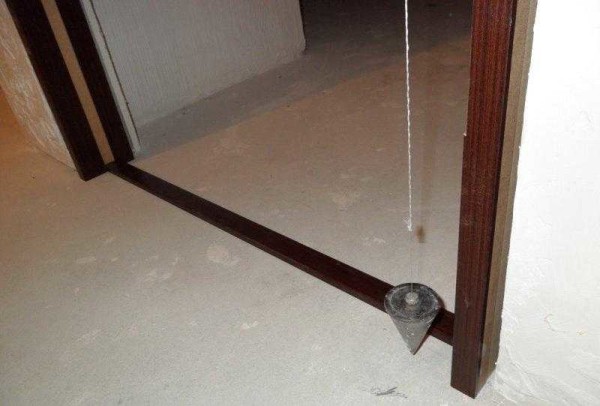
A box without a door leaf is exposed. It is oriented strictly vertically. The verticality is checked not only by the level, but also by the plumb line. The level often gives an error, therefore it is more reliable to check with a plumb line.
So that during installation the box does not warp, still install temporary spacers on the floor, slopes in the cornerswhich give a high degree of rigidity. To make the doors open, they are inserted in the same plane with the wall. Only in this way will it open completely.If the wall is uneven, place the box not along the wall, but vertically. Otherwise there will be problems with opening or closing the door.
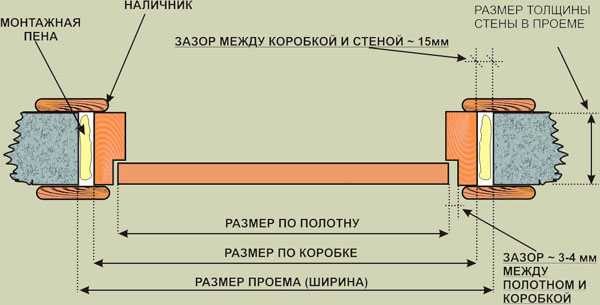
How to insert an interior door with your own hands - in the same plane with the wall
Once the position is selected, you can fix. This is done using mounting wedges - triangular wooden or plastic bars. First, wedges are placed on both sides of the lintel - crossbars, then above the posts. Thus, the position of the box relative to the doorway is selected and fixed. Next, the verticality of the racks is checked again. They are checked in two planes - so that they are not tilted forward or backward.
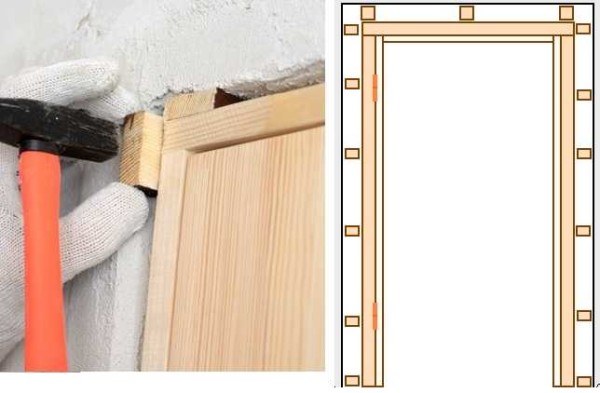
How to put an interior door with your own hands: wedge the box
Then the wedges are installed at the bottom, then after about 50-60 cm, checking that the racks are exactly level. The cross bar is additionally wedged in the middle. They check whether the elements of the box are not bent somewhere, correct if necessary. You can start mounting.
Step 4: attaching the box to the doorway
There are also two ways of fastening: right through to the wall and mounting plates. If the wall allows and you are not intimidated by the hats of the fasteners in the box, you can attach them through and through. It is reliable.
To install interior doors, it is enough to screw two self-tapping screws into the cutouts for the hinges and, on the other hand, under the plate of the counterpart of the lock. Additional holes are drilled in the cutouts. They are made so as not to fall into the holes for fastening the hinges or the counterpart. Make sure that the head of the screws is recessed and does not interfere with the installation of the hinges and overlays.
Installation of interior doors according to this scheme is shown in the video. There are also some interesting nuances about exposing the door frame.
If this amount of fasteners seems unreliable, they drill through and cover the holes with decorative washers matched to the tone. Or there is also a special MDF molding with removable strips. The fastener is installed in the prepared groove and then closed with a strap.
The second method is secret, the fasteners are not visible. First, the mounting plates are attached to the back of the box. In principle, it can be used for drywall, but there are also special ones - thicker, although when installing interior doors, drywall will be enough.
Step 5: foaming
After all the gaps are exposed and the wedges are installed, the gaps between the box and the wall are filled with polyurethane foam. For its better polymerization, the wall is moistened with water from a spray bottle. After that, the foam is squeezed out, filling no more than 2/3. Too much foam can cause the box to blow inward. Therefore, do not overdo it.
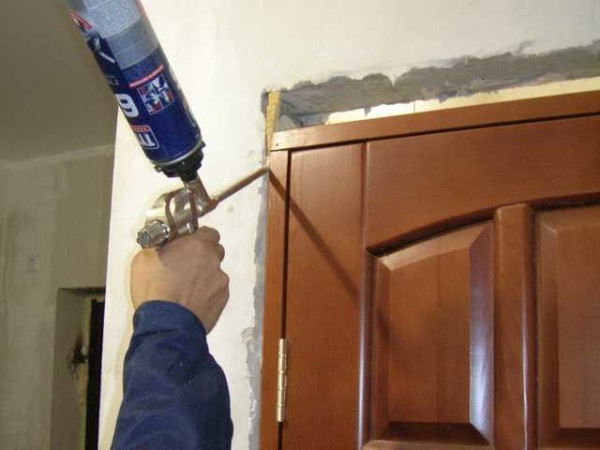
The gap is filled with foam by no more than 2/3
Spacers are used to ensure the doors are not warped by foam. But if you do not overdo it with foam, nothing should happen.
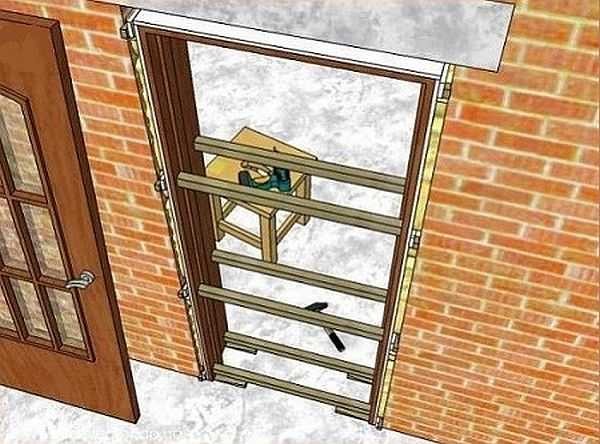
Spacers for fixing the box - with this installation of the interior door, the box should be level
After the foam has polymerized (the exact time is indicated on the cylinder), the spacers are removed, the door leaf is hung and the door is checked. Next comes the finishing work: slopes and platbands, if necessary - addons.
You know how to install an interior door with your own hands. There is nothing super complicated, but we tried to describe the main nuances. There is a lot of useful information in the video - these are recommendations from practitioners.






Write about sliding doors, they are now at the very top of popularity, although they are more complicated than ordinary single-double doors
There is such an article. Right here.
I am amazed at the guys who fumble about installing double doors like this and boast about it!
Last century! How old is this video?
There is also a normal fastener for SMS K-1.2, or K-22 - you take two sets and put a two-leaf one in 30 minutes!
Single-leaf 1 set of fasteners - in 15 minutes, and nothing gets out of the box!
We've been putting them on for a year and a half!
Yes, +500 rubles, but you don't even have to persuade the customer. He showed and explained that this is forever - an order in your pocket.
In the video, the platbands were not specifically shown, because they will protrude from the wall!
We didn't put on the sliding ones, we just don't put the sliding ones ... but I think you can adapt them there too!
Thanks for the informative article! You helped a lot with the installation, I decided to save some money. the choice fell on the luxury lines of the statusdor, and their prices there are not low, but the quality is very even! In general, I decided to save money, I bought the doors, but I do not know how to install)), if not for your article, I probably would have ruined 1-2 sets, thanks!
Good article, it is clear that a knowledgeable person wrote. As an installer with more than 5 years of experience, I want to give advice to people who want to buy doors to an apartment, in no case buy laminated doors, except as a temporary one, it is best to save up and buy veneered or doors with an eco-veneer. They are more expensive, but will serve you for many years.
Thank you so much! Very useful for inexperienced owners! You helped me a lot!
Thank you for your feedback. I am very pleased that our articles are useful))